

I often get a bit different post ideas, but rarely act on them. All the reviews and makeup looks just get in the way and then I forget all about it. Since I have more time right now, I can finally write posts that I feel passionate about and are not necessary reviews.
Today I’ll talk about what you should and shouldn’t do when it comes to makeup. Let me just clear something out. No, I am not a certified makeup artist and I didn’t do this post to offend anyone. I decided to do this to help others maybe change some of the things that they do and are not always the best. Of course, that is just my personal opinion and you may think some of those things actually look really good. That’s fine. It’s just makeup, as Wayne Goss says. You can take it off and begin again. People have different opinions and different styles. This is just what I think most people notice as being wrong.

Base
This is the first and most important part of any makeup. A lot of people forget about it. Moisturizer or primer is an essential part of how your foundation is going to look. We all have different skin types and we should have according moisturizers. I change them during seasons and based on what foundation I’ll be using on top of it. If you have dry skin, you should definitely put on moisturizing creams, because otherwise foundation may cling to dry patches and just looks very dull. If you have oilier skin, go for something more matifying or whatever you find that suits your skin best. If your skin has enough moisture, you can skip moisturizer and just go with primer. Primer is not a must have, unless you like it. You can just use face cream and it can work just as fine it all depends on your skin needs.

Foundation
You should also use the right type of foundation for your skin type, but it is not as important as moisturizers. I think that you can use very matte foundation, even if you have dry skin, if you use proper skin care before and make sure that your skin is in the best condition.
Choosing the right shade is crucial. You should know what your skin’s undertone is. You could be cool toned, warm toned or neutral. There are a lot of different ways to figure that out, so I’ll advise you to google it. Then you should choose the right shade according to your skin. One of the worst things is when you have too dark foundation. I think you can get away with lighter shades, but darker is worse. Most people tend to wear too dark foundations. Honestly, it’s not all their fault. Our drugstores have the worst shade selection ever. Almost all of them are too dark for most people. It’s one of the most frustrating things ever. Certain brands carry white foundations, which you can mix with your regular foundation and make it lighter. You can get away with a shade or two darker foundations, but for the love of makeup, blend it onto your neck. Foundation line on the jaw is still a no no.
For more information watch the video Choosing the Right Shade of Foundation by Lisa Eldridge.
You can even skip foundation, if your skin is really nice. There is no need to wear foundation if you don’t need it. You should also consider that foundation is for evening out your skin tone and getting rid of slight redness and such. It is not going to cover imperfections. For that you should still use concealer.

Concealer
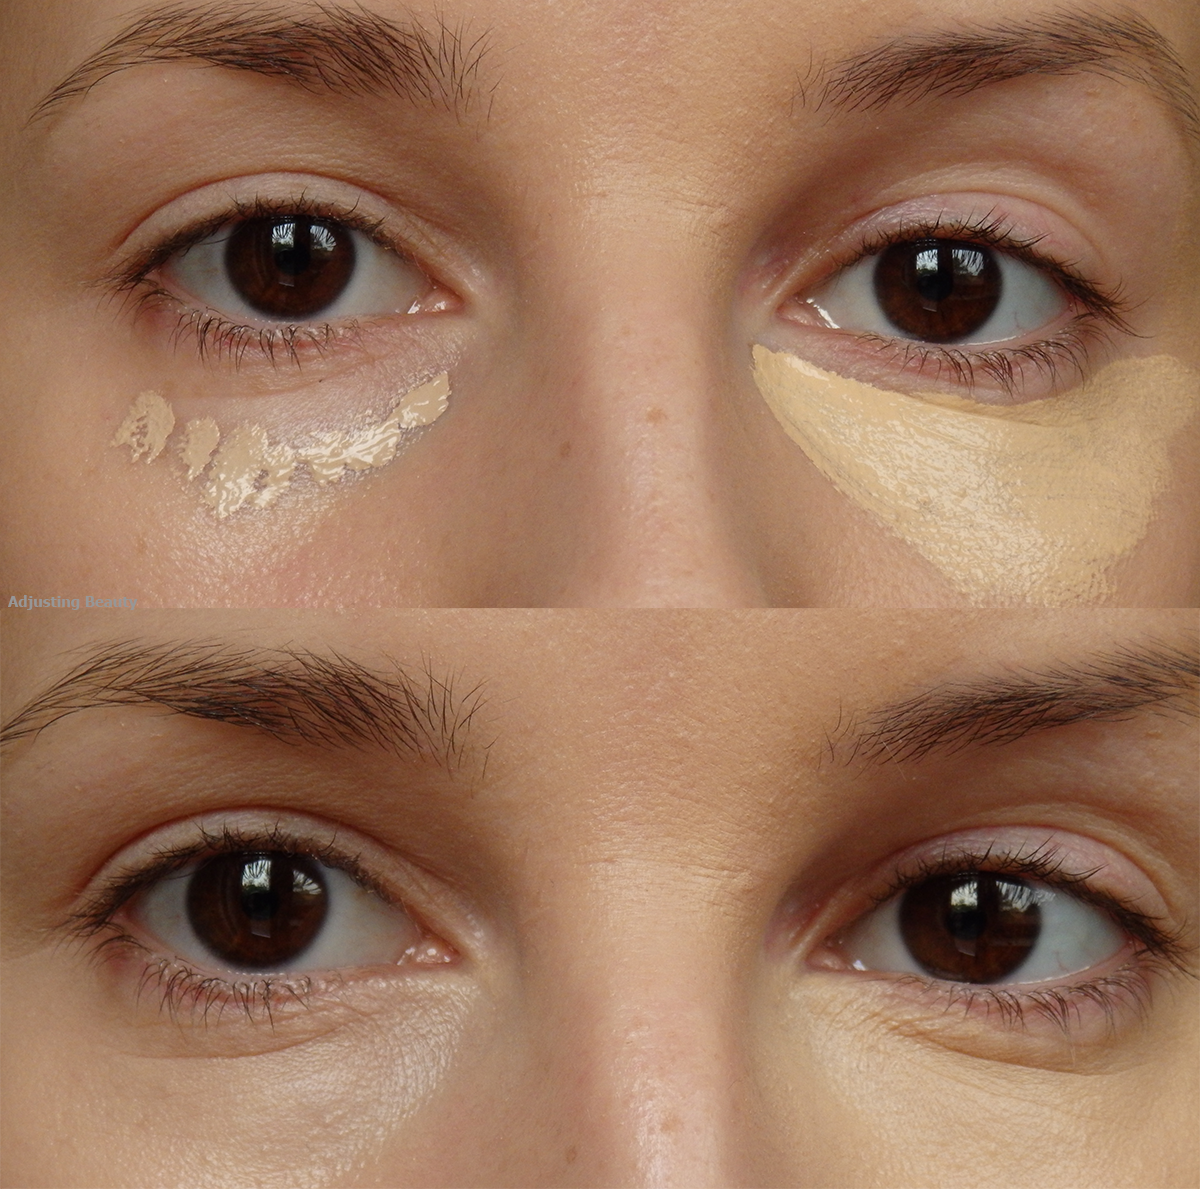
Obviously there are concealers and correctors. Concealers are usually the same shade as foundations and have higher coverage. While correctors have colors like salmon, pink, green, yellow and are used to correct undertones in your skin. For example, if you have red patches or red pimples, you can correct that redness with green corrector. Because these shades together neutralize each other. I am more of a concealer kind of girl. You should have similar shade of concealer to your foundation. You can use lighter if you want to also highlight some parts, like under eye area or darker, if you want to contour with it. But usually it’s best to use the similar shade to your foundation.
Too much concealer can make your makeup look very cakey and unflattering. I don’t know how some of those makeup gurus get away with wearing so much concealer underneath their eyes. It looks very unflattering, flat, cakey and gross on me. I am a believer of applying little and adding more if you actually need it. It’s also best to just use higher coverage concealer and not pile so much of it on. Especially on the under eye area, it can quickly settle into fine lines. For imperfections around your face, like pimples, patches and such, you should always use pinpoint concealing method. This means that you get very small brush and apply concealer only to the area that needs it. This way you’ll have higher coverage only on that particular part of your face and not all over it. It will look fresher and more natural.
Powder
This step is optional. I need it, but some may not. It depends on your skin and foundation. If your skin is dry and you don’t get oily through the day, you obviously don’t need it, unless you want to have another colored layer on top. If you don’t like dewy finish of foundation or know that it will start smudging all over your face in a couple of hours, then use it, because it may help keep your makeup nice for longer. You can choose among colored powders or use transparent shades, which are usually suited more for fair skins and don't add any additional color.
Eye Primer
This is also optional step. It’s not necessary to use, but it can help you a lot. It makes your eyeshadow last longer, makes it look more intense and evens out your skin tone, if you have darkness or capillaries around that area. You can already see the difference on the photo. On the left side I used eye primer and my skin is a lot more even.
Eyeshadow
I feel like most of makeup mistakes, happen in this phase. Most of people still don’t know how to make the best out of their eye shape. It also has a lot to do with bad practices from the past. We’ve all learned from metallic silver eyeshadows all over hooded eyes and the horrible one shade of blue eyeshadow.
There is million ways in how you can combine eyeshadows and what suits certain eye shapes and so on. There are some important general rules for applying eye makeup.
Eyeshadow should always be blended. Applying a patch of eyeshadow on the center of your lid and thinking that’s it, is wrong. You should always blend it. Eyeshadow should be more intense towards the center and should bleed into nothing coming to the outer parts of the eye. There shouldn’t be any visible lines as to where eyeshadow starts and where it ends.
Here’s one advice for those with hooded eyes. As you can see mine are slightly hooded, but not entirely. Your eyeshadow will look much prettier, if you blend it above your crease towards the brows. No, I don’t mean apply it all the way up to the brows, but just don’t stop in the crease. Because once you’ll look straight up, you won’t even see the eyeshadow. So go a bit above it to tie it together with the eyeshadow on your mobile lid, which will be seen when you look down.
Wayne Goss has a lot of tutorials on how to apply eyeshadows to hooded eyes. I just wanted to show you one that explains all the basics.
Wayne Goss has a lot of tutorials on how to apply eyeshadows to hooded eyes. I just wanted to show you one that explains all the basics.
Also don’t use dark eyeshadows in the inner corner of your eye, because this area is already darker because of the eye shape and shadows. This excludes those with wide apart eyes. You can actually use darker shades in that part, to optically bring eyes a bit closer. But for most people, it’s not flattering. As you can see on my photo, on the left I blended eyeshadow and put it a bit above crease and on the right I didn’t blend it and I used it also in the inner corner of my eye.
One of the mistakes that most people do is that they apply eyeshadow too low in their outer corner. You should always go up, because it lifts up your entire face. If you go too down, it just makes your face look saggy and your eyes sad.
Now let’s talk about highlighting the brow bone. I think this looks good on certain eyes, which have a lot of eyelid space. It’s an absolute death for hooded eyes. If you apply shimmery light eyeshadow on your brow bone, it will just accentuate that part and make it look even more hooded. You can get away with using matte shades and applying them just to the very arch under your brow and don’t drag it too down. It may look even better if you highlight above the arch of your brows.

Eyeliner
Ta ta ta taaam. I know it’s one of the scariest steps in doing your makeup. I won’t pretend like mine is always on fleek, because it’s not. It’s a hard thing to get it right and you should practice it a lot. Practice makes perfect. You can’t say oh I don’t know how to do eyeliner. You’ve probably tried it what, four or five times? That’s nothing. After you’ll apply it fifty times, then you can say you don’t know how to do eyeliner. But I guarantee you by then, you’ll know how to make it descent. It helps if you apply it with short strokes starting from inside. You can't expect to draw it in one swipe. If you can, kudos to you - you have one fan here (me). I thought about doing a separate post on my eye liner technique, so I won’t go into those details.
As far as the looks of eyeliner, it looks best if it’s thinner on the inside of your eye and thicker towards the outer corner. If you have hooded eyes, it should be a lot thinner, you can even tight line your eyes. You can go thicker, if you have a lot of lid showing, when you’re looking straight forward. I personally don’t like when someone does very thick eyeliner, because I think it just closes eyes and cuts the crease in an unflattering way.
As far as winged liner goes, you should always point wing upwards, never ever make it down. This will again make your eyes look sad. Just practice and find that angle that suits your eye shape. If you have hooded eye, your wing obviously won’t look pretty, if it’s at a very high angle, because your hooded eye will break the line of your eyeliner. It’s best if you do a slight angle and still make all the eyeliner visible. I hope you understand what I’m trying to say.

Brows
Brows have really been getting more and more attention these few years. It’s said that brows are frames to our eyes and you should frame your eyes nicely. This category may not even be a step for some of you, who have thick and dark brows, lucky you. As for us, that have sparse and light brows, we should definitely pay some attention to it. You can use eye pencil, gels and powders to fill them in. It all depends on how bold you like your brows.
What I think looks unflattering is making them too dark. I think brows are one of those parts of makeup that looks best natural. I don’t like when people with black hair use black gels to entirely fill in their brows. It can look a bit like an evil queen from Disney. You know what I mean. I think they’re called Instagram brows. It’s that brow that looks like you outlined it and then filled it in like a coloring. It’s too harsh and only looks nice on very little people. Never go too dark or too filled in with brows. At least that is my preference. Light feathery strokes and still showing through texture of your brows, looks more natural.
Mascara
Some people take their mascara, apply one coat, maybe concentrate more on the ends of the lashes and they call it a day. Wrong. First thing that may change your mascara application is wiping off the brush. Especially when you get new mascara, it has way too much product on. It will just stick your lashes together and make it look all spidery.
Then when you’re applying it, you should go really close to the roots of the lashes and really make it darker here. Then you can zig zag it up to the ends of the lashes. One coat usually doesn’t do much, so you should go back for as much coats as your lashes allow. Too much means you’ll get sticky lashes, too little results in no volume and no definition. If you’re lashes are super stubborn, use a separate mini comb for lashes to comb through them and separate them for more definition.

Contour
Never do line under your cheek bone. Just like with eyeshadow, blend it. It’s best to blend contour upwards and use fluffier, yet defining brush to get the perfect shadow effect. You usually contour under cheek bone, around nose, around the edges of forehead and along the jaw line but it all depends on what your trying to make recede.
Also chose the shade that imitates natural shadow. Too grey can look too dark and dead, while too brown can look like mud on your face. Also don’t make it too dark, because the whole point of it is to still look like a natural shadow to slightly define your face contours. Forget what you saw on Kim Kardashian, she films all day and has 20 flashes pointing at her whenever she goes out. You on the other hand live in daylight and anything too much will be very noticeable.
Also chose the shade that imitates natural shadow. Too grey can look too dark and dead, while too brown can look like mud on your face. Also don’t make it too dark, because the whole point of it is to still look like a natural shadow to slightly define your face contours. Forget what you saw on Kim Kardashian, she films all day and has 20 flashes pointing at her whenever she goes out. You on the other hand live in daylight and anything too much will be very noticeable.
Highlighter
Highlighter is a great way of adding some glow and dew to only those parts that you want to. It can make you look fresh and younger. The most common place to put it is on tops of your cheeks, close to eyes. If you have larger pores, you should avoid applying it on those parts of your face, which is usually more towards the nose. Highlighter will make those pores even more visible, which is not what you want. You can also apply it on the bridge of the nose, on the Cupid’s bow above your lip, on top of your brow arch and chin. It all depends on your preference and what you want to highlight.
Choosing the right shade means nothing too dark or too light, which can look very stark. Also make sure that the shimmer in it is just big enough to give you that glow, but not make you look like you played with glitter with your 4-year old cousin.
Blush
Shade wise, you should experiment with what looks best on your skin tone. But as far as application goes, you should be light-handed. You can always add more, but it’s harder to take it off, if you’ve applied too much. There’s nothing worse than looking like Marie Antoinette or clown.
Some like to apply it more towards the temples, to make it like a contour and some like to apply it on the very apples of the cheeks, in the center. Apples of the cheeks pop out only when you smile, so if your apples tend to drop when you’re serious, you may not be doing a favor to yourself. It’s best to apply it in an upwards motion to pull the face up. But that obviously depends on your face shape, so experiment. I prefer to use it in between my contour and highlighter also pulling towards the ear.
Bronzer
It’s one of the most underestimated products that most people don’t use. For all of those that apply too dark foundation with the excuse that they want to look darker, you should use bronzer instead. Bronzer is the one product that you can get away with, if it’s darker. You just need to properly blend it. It can give you that natural summer tan and it gives your face a 3D dimension, if you use ti in the right places. It can bright up your complexion and make it warmer. I love bronzer and never do a look without it. I’m pretty pale, so bronzer gives me that sun kissed skin and makes my face features a tad darker and 3D looking. It’s the best way to add color to your skin tone.
It’s best to concentrate it on the outer parts of your face or use it lightly all over in summer days, to accentuate the sun tan, that you’ve caught accidentally. You can use shimmery bronzers to really give you that summer glow or stick with matte ones, to help you contour your face. Bronzer is also amazing for making your face slightly optically thinner, if you apply it on the outer parts of the face.


Lipstick
I think we’re passed look-at-me-I-look-like-I’m-dead lipstick phase, but just in case someone’s still using it, don’t. A few years ago it was popular to use either very light shades of lipsticks or concealer as a lipstick. Those lighter than your skin tone shades make you look like you’re dead. It drains all the color from your face and does nothing for your lips. So please, avoid it.
It is crucial that you choose the right nude lipsticks for your skin type. Lisa Eldridge has a fabulous video explaining you on how to find the right nude lipstick for you.
It is crucial that you choose the right nude lipsticks for your skin type. Lisa Eldridge has a fabulous video explaining you on how to find the right nude lipstick for you.

Overdrawing your lips is another “popular” thing right now. It all became very popular with Kylie Jenner. You can absolutely overdraw your lips you just need to know how. First of all you can’t go too overboard. You can draw lip line on the outer part of your natural lip line, but if you’ll go too over it, it will look bad. When you’re overdrawing matte lip products look better, because they flatten your natural lip line and therefore make it look like it isn’t there. You can go a bit over your line on the center of your lips, but go more towards your natural lip line as you come to lip corners. This will give your lips pout, but not make you look like Joker.


Lip liner
Your lip liner and lipstick should be close in the shade department. Don’t use dark lip liners and light lipsticks, it will make you look like a certain stereotype of the ladies of the night (know what I mean?). It doesn’t have to be exact same color, but just use similar shades or don’t use them at all. Of course now there's more and more contrasts between lip liner and lipstick with techniques like ombre lips, but this should be done carefully and well blended.
Lip liner is best paired with dark lipsticks, because you can get a more precise line with lip liner and dark lipsticks are less forgiving than lighter ones.
Lip liner is best paired with dark lipsticks, because you can get a more precise line with lip liner and dark lipsticks are less forgiving than lighter ones.


You can slap on that nude shade and no one will really look at it closely or pay attention to mistakes. But when you use dark shades of lipsticks, make sure that the application is even and that edges are well blended. There’s nothing worse than an uneven layer of lipstick. It just makes you look sloppy. If it’s hard for you to apply it straight from the bullet, well use a brush. A brush can make you help draw that precise line around the edges.


This is all that I came up with for now. I know, it's already a lot. Makeup is a profession and a lot of people study it and use different techniques to get the most flawless makeup application. If you just want to look nice with natural makeup, I hope my tips helped you.
Obviously rules are to be broken and by no means I'm trying to say that you should follow any kind of rules. This is just a guideline as to what I think looks nice and what I think looks flattering on most people. But you do, what makes you happy, because makeup should always make you happy. Don't stress about it, just have fun with it. It's here to make your life a bit more colorful and happier.

.jpg)


0 Yorumlar